Payment Screen
The information on the screen is defined as follows:
Note: The contract number will be assigned after the contract is printed in the form of X – Y, where X is the number and Y is the store number. Single store systems will have a store number of 001, but it will not be displayed. When using the multi-store version of Enterprise software, the store number can vary from 001 to 999 and indicates which store “opened” the contract. The other fields are:
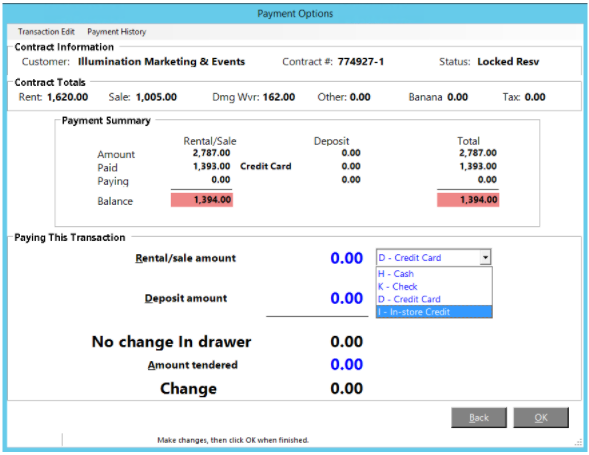
Payment Summary
The Amount row is the sum of all the line item rent/sale prices on the contract and the sum of all deposits collected.
The Paid row is the sum of all rent/sale and deposit payments made prior to this transaction.
The Paying row is the rent/sale and deposit amount(s) being paid or refunded this transaction.
The Balance row displays any rent/sale balance due highlighted in red. If no balance is due, 0.00 will be displayed highlighted in green.
Paying This Transaction
In-store Credit: By clicking on the Apply In-store Credit, the contract will be paid using the customer’s in-store credit. If the customer doesn’t have enough credit to cover the entire cost, the credit he does have will be applied. Note: This button is only displayed if the customer has an in-store credit.
Rental/sale amount is the amount that is being collected and the payment method for this transaction. An overpayment may be taken in this field if the user has that ability turned on in security. Lowering the value of any contract paid in full and not refunding the customer at that time, will leave the due amount in this field regardless of the user’s ability to take an overpayment. This amount could be moved to the deposit field if the user wished.
Deposit amount is the deposit amount that is being collected along with the payment method for this transaction.
Select Method is for the method of payment such as Cash, Check, Credit Card, Debit Card. Under Parameters, you can set whether the system defaults to a certain payment method or forces the counter person to select the correct payment method.
Net change in cash drawer is the total amount being collected for this transaction regardless of the form(s) of payment.
Amount tendered is the amount of CASH being tendered. Entry into this field is optional and is only used to compute CASH change.
Change - the amount of change to be given in response to the input of amount tendered. If no entry is made into the Amount tendered this amount will be the amount paid.
You can modify the fields by pressing the TAB key to get to the desired field. You can also hold down the ALT key and press the underlined key (i.e. R for Rental Amount, D for Deposit Amount). If you select one of the fields, you will be permitted to change the field as mentioned above.
OK Button: If you click the OK button, you will be asked if you are finished making changes. If you are finished proceed to step 8 below.
Back Button: If you click the Back button, you will be put back to the contract items screen to make any changes.
Cancel Button: If you click the Cancel button, the contract will be cancelled and all of the items will be returned to inventory. You only have this option when opening the contract.
Another Payment: If you click the Another Payment button, the payment you have entered will be written and you will be asked for another payment amount and method. This is helpful if the customer wants to pay $100 cash and the rest of it with a check. Note: This button is only displayed if you made a partial payment.
Various printing options may be selected from the menu below:

Select the desired option by typing the underlined letter on each button or use the mouse to select the option. The printing options are defined below:
Dot matrix contract printer: This selection will print to the dot matrix contract printer.
Receipt printer: The contract will print to the receipt printer. This option would normally be used only if sale items are on the contract. If some or all of the items are rental items, the contract will print but much of the data that would print if sent to the contract printer such as safety messages, date/time out and date/time due will not print due to space limitations of the roll paper.
Laser contract printer: The contract will print to the Laser Contract printer.
Email: The contract will be added as an attachment to an email. The contract attachment will be in Microsoft Word format. The customer’s email account will be the default; however, you can type in a different email account. In addition, you can follow the email address with a semicolon and enter another email address to send the contract to. You will also have the opportunity to change the default email subject line and email body. The default subject line and body are set under Parameters. Note: This feature requires that you have an email program installed, configured, and working on the terminal. If you are using Microsoft Outlook, then it must be currently running on the terminal to send an email. Microsoft Outlook Express does not have to be running, but it does have to be configured.
FAX: The contract will be faxed in the same format that prints to the laser printer. If the customer has a FAX number listed in his customer record then that number will be the default FAX number; however, you will be allowed to type a different FAX number. Note: You must have a Fax/modem installed in the server with a telephone line plugged into it. Windows Server comes installed with FAX software.
FAX with Cover Page: The contract will be faxed in the same format that prints to the laser printer. You will be given the option to select a cover page and enter notes for the fax. You will be required to type in the desired FAX number. If the customer has a FAX number listed in his customer record then that number will be loaded into the clipboard which can be pasted in the phone number field by using Ctrl-V or right click, paste. Note: You must have a Fax/modem installed in the server with a telephone line plugged into it. Windows Server comes installed with FAX software.
View on Screen: The contract form will be displayed on the screen. From that screen, you can print or export using the buttons at the top of the report.
Laser, Email, FAX Format: When printing to the laser contract printer, FAX, or email, you can set the desired format for the contract. You can define up to 10 different contract formats. You define the formats under Configuration, Laser Contract Format. Each store can set the default format for their store under Contracts in the Parameters. In addition, you can set a default format for each customer within the customer record.
Select Printer: This option allows you to set the printer the contract will print to.
Number of Copies: Clicking the scroll up and down buttons will change the number of copies to be printed. In addition, you can just press the “1” key for one copy, the “2” key for two copies, etc. up to 9 copies.
Print Load Slip: The load slip is a form that prints on a receipt printer that lists the contract number, customer name, date, time, and each of the items on the contract as well as their quantities. This slip would then be given to the person loading the equipment. The quantities would be checked and any serial number or hour meter information would be written down. The completed load slip would then go back up to the counter to attach to the contract. This option will only be enabled if you have defined a printer under Load Slip Printer in Printer Setup.
Print: The Print button will print the contract with the selections you have made.
No print: The contract or modifications to it will be made and written to the server but the contract will not print.
Note: The contract number will be assigned after one of the above options has been selected.
Note 1: If you are printing the rate structure below the items on a contract, it will no longer show periods that are not a complete day. (except those that are less than 24 hours.)

Press ENTER to return to the previous screen. Click Reprint Contract to select another format to print/fax/email. Click Return to Contract to return to the current contract in ‘Inquire’ mode. Click Clone Contract Header to open another contract for this same customer with the same date/time information. Click Create IRO to open a repair contract for any items on this contract that came back broken. Customer Dashboard will open the dashboard for their contracts’s customer. Logistics Tickets will take you into the logistics builder.